1972 Schwinn Super Sport

Mark brought in this family treasure a few weeks ago, and said he was either going to buy a new bike, or build this one into something he could ride regularly. Well, we love seeing old classics like this restored, and better yet, ridden. So, here you are:

IMG_2676

Mark is pretty capable himself, so he tore the bike down and did all the polishing work himself. The first change he wanted to make was to get rid of the one piece steel crank – he quickly discovered there are nice parts from Wheels Manufacturing to convert an old one piece style bottom bracket to accept a modern euro bottom bracket. he also tore down the wheels and rebuilt the hubs.

The cones in the Schwinn Approved Mallard hubs were damaged, which is pretty common, so we found a set of used small flange hubs on eBay and bought them for the parts. As you can see Mark polished them up beautifully. We had the Wheel Department at Velocity build the wheels, because we’re a bike shop, and it’s June. Jeff Jacobi took the extra time to build the wheels as Schwinn would have – aligning the spokes so there are no old spoke marks to see on the hub. The rims are Sun CR18 rims, good double wall rims that looks the part – and polished of course, because Mark.

Once the wheels were done, Mark installed some Panaracer Pasela tires and a 6 speed freewheel, yes 6, we realize it would have come with 5, but why wouldn’t you make it 6 if you can, I mean, his intent is to ride this bike. At that time we helped him select a bottom bracket to set a good chain line.

We replaced the original brakes with some TRP side pulls just to add stopping confidence. Mark polished up the original stem, bar, seatpost and clamp. He bought some Brooks Proofide to recondition the Brooks saddle as well, it’s quite comfortable.

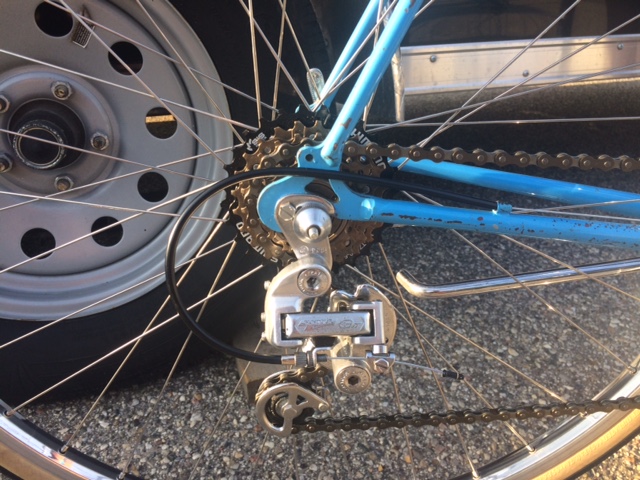
As he was reassembling the bike, Mark found the derailleurs were a little bent and didn’t move real well. Again, a quick search on eBay brought a “lightly used” Suntour GT rear derailleur, and a NOS Suntour Sprint front derailleur. The front derailleur came in the packaging with the instructions on how to properly install and adjust it, as well as the instructions for the GT rear derailleur! Mark says he tore apart the rear derailleur to clean and lubricate it, but he’s convinced it’s never been ridden, the pivots are tighter than some modern derailleurs I’ve worked with. Mark installed the derailleurs, cabled the bike and brought it in for a chain installation and derailleur adjustment.

IMG_2680

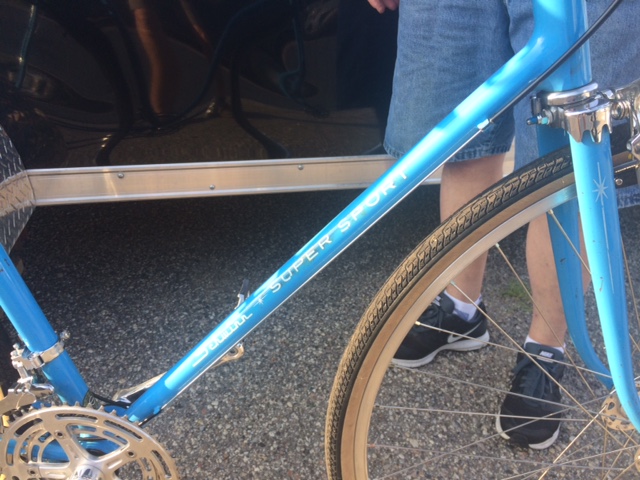
One of his last steps involved polishing the frame. This step can damage a nice old bike if you’re not careful. Mark was gentle enough that he didn’t remove much paint and really brought the blue back as well as removed a lot of discoloration in the decals.

IMG_2678

Mark was nice enough to let me take it for a spin, in fact I think I rode it before he did. I have to say, it’s made me consider building an old Schwinn that I can ride.

Mark, it was an honor. Thank you. Brian Walquist.

My Custom Bike

IMG_2494

I’ve wanted a custom bike for a long time. There’s something about it, working with the artisans who help you decide on all the details, build the frame, and paint it so lovingly.

I happen to need some pretty specific dimensions, so a custom frame is more than just a desire for me. It may actually be the only way I’ll ever have a bike that really fits me, and allows me to be comfortable and create the kind of power I’m really capable of while riding. This isn’t to say I’m the fastest person on a bike; it’s just that joy for me while riding comes from being able to put down my best effort. I want to be competitive. Or at least as competitive as I can be.

Mike Clark set up our fit bike for me so I could evaluate the fit numbers from my new frame prior to ordering. I just wasn’t sure we were building a bike that had a short enough top tube. The fitting problem for me, comes down to having a short top tube, and a high front end. I’m not all that tall, but I have longer legs for my height. So I’m forever battling to find a bike that is tall enough, but that allows me to reach the handlebars.

My evaluation on the fit bike was “it seems short”. Whew. Yes, I think Johanna at Waterford hit the measurement for me. It should fit well.

Fast-forward to when the frame and fork came in last week. I chose not to order the majority of the parts right away. I kind of wanted to hold the frame, and make sure that the parts choices were right. I’m building a road bike, or a gravel road bike, or a cyclocross bike – whatever. Honestly, if it fits, I’m never getting off of it.

So now, after endless consideration and researching, I’m going to start with a set of wheels I already have: Velocity Aileron Pro Build. Good, strong, relatively light, and tubeless ready. I’ve been wanting to try a “woodchipper”-style bar – it happens that we have a set from a GT Grade so I can test them and order the pretty and lightweight ones once I’m happy with the shape. A Thomson Masterpiece seatpost seems obvious. I’ve become a fan of the Fabric Scoop Shallow Ti rail saddle – easy choice. I’ve chosen Shimano Ultegra as my parts kit. I’ve ridden Ultegra most of my adult life. I know how it works. It’s incredibly reliable. It’s reasonably priced. It’s pretty. I happen to like the Cannondale SI-SL crankset, and we happen to have one lying around. A BB30 bottom bracket wasn’t a big stretch to get this crank into the bike (no the frame is not BB30). Last, I’ve chosen TRP Spyre brakes. I wanted to use cable levers because they create a shorter reach on a bike than their hydraulic counterparts. I’ve been pretty impressed with these brakes as well, and I don’t weigh much, so they don’t need to be super powerful.

It’s been a really long time since I built a bike up from the ground, for me. This should be quite a nice experience. I’m hoping it takes a little time . Brian.

Monday

Monday was supposed to start with some riding, but rain put that off. We sat in a presentation on the overall bike market and then We went through Cannondale’s new women’s line of bikes. Cannondale has been improving the bikes they build for women for years now. This year is no exception, we’ll be adding some to our own demo lineup.

After the presentations, I went back to my room to finish up the orders I came to place then got out riding again. This afternoon I rode a Bad Habit Carbon 1, I have to tell you it restored my mountain biking confidence, I was feeling a little timid after yesterdays fall. 120mm of travel and 3 inch tires will make most of us more confident. We rode the lift up and rode down – if you haven’t done it, it’s harder than it sounds. You’re holding on tight the whole way down, dropper post down (so standing up), and jumping at every chance. I know the Trigger is faster, but I have a brand new appreciation for a mid fat tire on a plush full suspension. I even doubled a jump (yes only one). This bike, and the location once again reminded me of why I like riding.

IMG_2095

Sunday

Sunday morning came pretty early for me. My usual Sunday morning I’m either up making a nice big breakfast with my wife, or I’m out riding early. Today I’m at a ski resort in New Jersey to see the new Cannondale and GT bikes, as well as see what I can learn about the bicycle business in general.

During the road presentation today I got the details on the new 2018 Cannondale Synapse – lighter (over 300 grams frame and fork) stiffer, more tire room, and most of them using disc brakes. As you know if you read my post from Saturday, it’s an amazing bike to ride. Snappier, more confident at speed, and pretty comfortable for long rides.

After Lunch we got to see the new Mountain bikes, some new scalpel models, F-Si in some great new spec’s and colors, the new Trigger. Most exciting are the changes to our everyday sellers like the Trail and Cujo models with 1x drivetrains.

Cannondale is going after the kids market too, lighter, better geometry for safely learning to ride, they even have a lefty on the smallest balance bike.

Through all of these new bikes there are two themes

  1. SE for Special Edition. Road, gravel, and mountain bikes with wider tires, wider bars, dropper posts and more suspension travel (in the case of the scalpel). These SE model bikes look great and have features many of our clients are asking for on their bikes.
  2. Electric Assist. We’ve been playing with a Quick Neo at the shop for a couple of weeks, this bike goes 20 mph without a ton of effort and has good battery range. There’s even a full suspension mtb and a hardtail 27.5 Cujo model.

So after the work today, I went on another ride. As I mentioned, I grew up as a roadie, and Ted King was leading a ride, couldn’t really turn that down now could I? I chose a SuperX SE – a model we have on the floor and will be offering some demo time on next week. It’s a Cyclocross bike with a wider rim and tire and a 1x drivetrain. Did I mention it has some really sharp WTB Riddler 37c gumwall tires, definitely in fashion right now.

Ted is a former world tour level pro rider, most of us that went along, are not. He took it easy on us. We went just over 20 miles and this bike definitely didn’t stop me from keeping up, my lack of miles did that for me. Beautiful hilly terrain again, one flat to repair (on a super6) and I was incredibly comfortable. Many of the reasons I like my Slate are shared in this SuperX. No worries for potholes or gravel and good solid rolling speeds.

After returning from the road ride, I grabbed a trigger and took it up the lift. I am not a big jump guy, I’m a decent cross country rider, but the rocky terrain and jumps are something I need some time to get used to. I followed Matt from Brick Wheels down the Greenhorn run a few times – on the last run I went over a feature and was surprised by the way it transitioned – I fell – moderately. More harmful to my pride than anything, but a good reminder to ride within your skill set. I’ll be bringing armor next time.

After dinner our GT inside rep walked me through the expanded GT BMX line as well, some great park, classic, and race product in here, check out the pics.

All in all, a good day.

Saturday


This slideshow requires JavaScript.

I own a bike shop, it’s a decent gig. I work a lot, especially at some of the best ride times of the season. But it has it’s perks. Today I’m at a ski resort in New Jersey to see the new Cannondale bikes I’ll be selling in 2018. I’ll work all weekend, well kind of, sitting in presentations, evaluating the new product offerings and placing some orders… but when I arrived today I had the chance to take a new Cannondale for a ride.

I wasn’t even sure I wanted to ride, you know how it is… I’ve been moving through airports and sitting on a plane, then a bus to the hotel. On any given day I know if I go ride I’ll feel better, and today was no different. I couldn’t even make up my mind initially about what to ride, there are some amazing bikes here, but I grew up on road bikes, so that’s comfortable and makes me feel confident.

I settled on the 2018 Cannondale Synapse Hi Mod Disc Dura-Ace road bike. This bike is amazing in all the ways it should be, lightweight, it offers the comfortable geometry I need (I’m not 25 anymore), it’s stiff, and it shifts and brakes perfectly. One of the demo personnel sent me out on an 18 mile loop, perfect because I only had about an hour and a half before cocktail hour, wouldn’t want to miss that. This loop had everything, punchy little climbs, fast descents, in fact as I rode longer I realized, I was no longer paying attention to the bike, it was performing just as it should. It allowed me to look around at the scenery (it’s beautiful near Vernon, New Jersey), I had a flock of Turkey’s cross my path 20 strong, I saw deer, and more hawks than I have ever seen on any ride. In the last few miles of the ride, I was even on some gravel, which I love. To sum up, amazing, I feel great, now to head to that cocktail party.

I’ll try and share a few more experiences from this trip and of course the cool bikes I ride. We’ll have some form of most of them at the shop, and plenty of news outlets are better at the specifics of the bikes, so I’ll let them tell you what tires Cannondale chose to spec the bike with. Suffice it to say, I enjoyed this new Synapse, I’ve owned and ridden my share of top end road bikes, this one is as nice as I’ve ridden. Maybe this is my next steed, although I do like my Slate, maybe I’ll just need to have both of them.

I included a few pics as well, there’s a new SuperSix Evo with chrome seat stays, the new orange Slate with knobby tires and a new 1x spec, and of course the Synapse I rode.


What it means to love this sport.

There’s a risk in loving something too much and the risk is losing that thing which you love. This cycling community that we all circle in is something that we share a deep love for. The experience of the ride. The camaraderie of friends. The closeness of relationships developed over miles traveled, shared experiences and the passing of time.

12031480_793047920817525_6018387376716202564_o

That is what makes cycling special. It’s what makes the cycling community special. Some of us race, some us ride for fun, some of us love to ‘nerd out’ on gear, and others chase KOM/QOM’s. Some of us are simply looking for an excuse to eat whatever we want and drink a couple beers once in a while. For most of us, it’s a combination of these things that draws us to this sport.

The common thread however, is people. Today we lost a person. A friend, an athlete, a gentle force, a teacher (economics professor at Montcalm Community College), a mentor, a consummate competitor, a person who you could ALWAYS depend on for a supportive word and a smile. There was literally no exception to this.

I’m going to miss you Mike Seaman. I’m going to miss you for the races we did and the races we never will. I’m going to miss telling you about “this thing I wanted to tell you about”, and how you inspired many of us to push ourselves and to ulitmately persevere.

Sometimes we love this sport because it hurts. Your calves burn on climbs, your quads burn in a sprint. You give up skin on the road or the trail, and you cramp on a long ride. Yet, you persevere. You work through the pain. You manage it, you own it and ultimately overcome it.

That is what we are going to do today. We’re going to own this pain. We’re going to persevere. We’re going to think of our friend Michael Seaman and remember his laugh, his amazing attitude, his calming smile and we’re going to work very hard to make cycling safer to honor his memory.

– Don Lee


The Definitive Guide to Riding Your Bike To A Whitecaps Game

via facebook

Baseball season is in full swing! If you’re ever driving up US-131 or West River Drive during a home game at Fifth Third Ballpark, you’ve certainly noticed the traffic backed up for a mile in any direction. It’s even worse when the game gets out, with darkness compounding the congestion.

What a lot of people don’t realize is that the ballpark is surrounded by the White Pine Trail, the converted railroad line that extends from the North end of Riverside park to Cadillac. There are a ton of places to park and then ride your bike right up to the gates of the ballpark without dealing with traffic or paying for parking.

Where to start your trip

From the South:
If you’re coming from the south, Riverside Park on Monroe Avenue north of Leonard is an ideal place to stage. The most southerly parking at Riverside park is only 3.6 miles from the ballpark, all on paved off-street path. The path winds up through the park, with the option of a fast protected bike path next to Monroe Ave or a more leisurely winding path next to the river. Both converge at the expressway underpass and then a quick connection at the Park St roundabout gets you toward the White Pine Trail. Take the first right to go straight to the park, or continue under US-131 to connect to the path through Comstock Park. Both options go directly past the ballpark.

Looking to start and end your trip downtown? It’s easy to extend your ride. From downtown, just take Monroe Ave north, using the bike lane all the way to Riverside Park.

From the North:
A great option if you’re coming from towns on the 131 corridor, Rogue River Park off Belmont Ave in Belmont offers plenty of parking and direct access to the White Pine Trail.

Don’t forget about Trailside Treats behind Belmont Market to cool off!

When you get to the north access road near the AJ’s Family Fun Center next to the ballpark, follow the path left until you get to the south end of the ballpark.

At The Ballpark

The bike racks are located on the apron around the ballpark on the southern edge. At the time of this writing, they are the barricade style that accept a wheel, but not just a frame. Bring a flexible lock, like a strong cable or folding lock.

After The Game

Keep an eye out for inattentive drivers always, but especially when you get out of the game! Flashing lights are highly recommended as the human mind naturally notices flashing and movement. Be courteous to your fellow trail users!

Downtown Comstock Park is just down the path from the ballpark. Stop by for a 10th-inning beer at Elk Brewing, grab a pizza from Vitale’s, or an ice cream from Dairy Delite!

As always, ride and drink responsibly! And don’t eat too many hot dogs!!

Enjoy the game and drop us a line if you need anything to help get you riding!

The Mysterious Cue Sheet

Many of us that go on long rides these days have a fancy GPS device with some kind of navigation function, making it really easy to upload and follow whatever wacky route you cooked up late at night four beers in. In the olden days, riders would have to write down their turns by hand and wrap them or clip them to somewhere convenient, periodically checking throughout the ride to make sure they were on-course.

The big races and rides release the course maps and files ahead of time, but reading a cue sheet is a good skill to have (and more challenging!). Using just the instructions written down lends a bigger sense of adventure to a ride, and simply following someone around a turn becomes a much riskier proposition.

For the HellKaat Hundie, everyone gets a printed sheet with every instruction. We’re going to give you some pointers on how to read it. All cue sheets have the same basic features, so this lesson will be pretty portable to any race or ride.

cuesheet_2.PNG

On the very left you’ll see the “leg” distance. That’s the distance to the next instruction. Leg distances are sometimes in different columns, so familiarize yourself with them before starting your ride.

This example card has a visual indicator and a “type” which indicates left, right, straight, etc. This gives you a fairly easy method to identifying what you should look for without parsing an actual word in your head.

The Notes column has the actual instruction and the street, feature or landmark. Sometimes these are obscure such as “Turn left after the second barn”, but most of them will accompany a signpost of some sort.

The last column is the total odometer reading at the instruction point.

So for this example, you would read it, “In one mile, turn left onto 140th Ave. Your total distance at this point is one mile. In two miles after that, turn right onto 12th St. Your total mileage at this point is 2.9 miles (maybe 3)”.

Yes, there’s a minor discrepancy there, but that’s because a lot of cue sheets are automatically generated from a mapping program. You will encounter rounding errors here and there, but unless the routemaster is especially devious, there won’t be anything truly confusing. One tenth of a mile is 528 feet, so it’s close enough for government work.

If you get off-course, your total mileage will be off. That’s where leg distances are helpful. You can also use your odometer to figure out how far off you went, and then add that total distance (including doubling back) to your Total mileage. Otherwise, you’ll just need to be checking that cue sheet more often!

Knowing how to read a cue sheet is fun, adventurous, and a good backup for the space compass when you forget to charge it or it simply decides that reality is a lie.

See you out there!

Bike “Fit” – What’s the big deal?

By Mike Clark

In the past 10 years or so, the topic of “Bike Fit” in bike shops has gone from a behind-the-scenes protocol practiced by a few forward-thinking shops to “the mainstream”. You can “get fitted” now with lasers, stop-motion video capture, adjustable-while-you-pedal fit bikes or the tried-and-true tape measure and eyeball technique. (And you can expect to pay accordingly. The going rate for a “fitting” in U.S. shops ranges from $50-$600)

You can also find a bevy of physical therapists, sports medicine practitioners and yoga instructors offering fit consultations devoid of a shop connection – not to mention frame builders, coaches, and racers.

So, how did we get from “stand over this one, does it hit you in the crotch?” to a several-hundred dollar session involving body measurements, a flexibility assessment, and maybe some fancy tools? Basically, the advance of sports medicine and orthopedics gave us a lot of insight into how the body works best while on the bike. Lots of apparently small pieces make up the whole puzzle. Folks realized that bikes weren’t built for everyone out of the box.

The current general consensus that “Fit Matters” is great in our opinion, and we’d place ourselves among those aforementioned forward-thinking shops that figured out back in the day that offering our clients a more evolved level of bike fit was going to result in happier, more efficient, faster, and more comfortable riders with fewer injuries. We LOVE that the bike biz has caught on!

Fundamentally, your bike fits properly when your contact points (hands, feet, butt) are in the proper relationship when you sit on your bike(s). When your saddle height and fore-aft position is spot on you are a pedaling machine: efficient and powerful and protected from injury. When your “reach” or “cockpit” (the distance from saddle to handlebars) is correct for your particular combination of torso length, arm length, flexibility, age, injury history, riding style, goals, and preferences you are the ideal combination of biomechanics, aerodynamics, and comfort. When your handlebars are the proper width for your shoulder measurements, you slip through the air without giving up control or leverage.

And most of all: you ride without pain (or at least only with the pain of the effort – should you chose to go there)

How do we do “Fit” here at Alger Bikes?

We’re a bit “old school”. We believe in and rely upon The Fit Kit, the industry’s original fitting system. The Fit Kit showed up waaaay back in 1982 and remains utterly valid in the face of about 23 bazillion (estimated) new systems that have been developed over the past couple of decades. In addition to The Fit Kit’s database and bevy of tools we apply the knowledge and insights we’ve gained from performing hundreds of fits as well as riding thousands of miles. We’ll take some skeletal measurements, ask you a few questions about your injury history and goals and do a quick flexibility check. This will allow us to properly size your new bike and help us position you properly on it.

(This service is included with the purchase of any road, gravel, cyclocross, mountain or tandem bike)

We also offer “remedial” fittings for a bike that you like enough to keep but doesn’t currently fit well enough to ride. We can “fix” fit issues, help you nail down your aero bar position, chase away aches and pains, help you shop for a used bike that fits you and make sure that you’re in the proper position.

Regardless of your fit needs, we’re ready and eager to help you out. Please stop by any time!

Mike Clark has fit a pretty huge percentage of West Michigan’s riders, and has been professionally trained to fit a couple custom makers, like Seven Cycles

Cleaning the Barry-Roubaix Off Of Your Bike – The Alger Bikes Way

So – You raced Barry last weekend (or Melting Mann the weekend before, or Landrun 100 the week before that) and your bike is still sitting in the garage covered w/ mud, right?

We feel ya.

Early season gravel races, the infamous “Mud Year” up at Iceman or just all of those dirty rides in between – the cruel truth is that bikes get dirty…but work better when they’re clean.
So – how do we get there?

The longer that you let it sit, the bigger project it’s gonna be so let’s get it started

First off – water is okay. The car wash is a option but your good ol’ garden variety garden hose is good too.
RULE #1 – Do NOT direct water at high pressure at the headset, bottom bracket or hubs! Water isn’t bad per se….but blasting away at the bearings will ensure that you force H2O past the seals and contaminate the grease (Can you say “Time for a new bottom bracket?”). As a good guideline: direct running water PAST bearing areas, not AT them, and you’re good.
Remove the wheels and use the water to rinse off as much of the dirt/mud as you can. Then take a clean rag and do the “shoeshine boy thing” in all of the nooks and crannies, paying special attention to the derailleurs and brake calipers. An old toothbrush or that Park GSC-1 brush is good for getting crap outta the chainrings and frame junctions.
Once the frame and components are spotless (kidding!), give the wheels the same treatment. Make sure that you clean out the space between the cassette cogs ‘cuz dirt loves hangin’ out there.
Okay – wheels back on and onto….
SPECIAL PROJECT #1 – The chain is likely a mess. This guy has a huge job to do and is worthy of some TLC. Take a brush or clean rag (and maybe some degreaser) and clean it off as best you can. You’re gonna re-lube it and there’s no reason to lube a dirty chain as you’re simply rinsing the dirt down farther in the rollers. Park makes a cool device for cleaning your chain called the CG-2 that is essential a car wash for your chain that makes cleaning it a piece of cake… but failing that some elbow grease and some solvent will get’cha there. Once it’s as clean as you can get it, wipe it dry and apply your chain lube of choice (We like T-9).
SPECIAL PROJECT #2 – Your shift and gear cables are likely running through their respective housing slowly and with a lot of extra drag. Some attention paid to them can really help with shifting and braking. For the shift cables, shift your bike into the lowest gear then shift all the way into the highest WITHOUT TURNING THE PEDALS so that the cables hang loose. Then you can move the lengths of housing back and forth and even hit ’em w/ some lube. For the brakes you can lube the housings at the points where the cable enters and exits. (Note: Internal cable routing effectively eliminates this trick)
Once the cables are running as smooth as can be – it’s time for….
SPECIAL PROJECT #3 – Brake pads! Whether you were fortunate enough to finish B-R w/ function brakes or were among the decent percentage that were seen employing the “Flintstone Brake Maneuver” by the end, the fact is that wet gritty conditions beat the crap outta brake pads. Even if yours aren’t all the way gone, check them for wear and to make sure that there’s no grit embedded (that’ll ruin your rims or disc rotors).
Okay – that may sound like a lot of work but it’s r-e-a-l-l-y only about 45 minutes of good work – and you’ll be REALLY glad you did come Lowell 50 or the Hellkaat Hundie!

As always – stop by the shop w/ questions, issues, problems or just ‘cuz you wanna hang around and talk bikes!

Mike Clark has worked, owned, or operated bike shops most of his adult life. He has an inordinate amount of experience cleaning crud off bikes.

MikeClarkLandRun